전 글에 이어서 나머지 구현들을 해보도록 하자
<남은 구현>
1. 스크롤링
2. 나머지는 자물쇠 채워져있기, 크기만 커지고 색상은 안바뀌기
3. 코드 다듬기
4. 이름 json으로 불러오기
5. 버튼 넘어가면 3d 모델 사라지기
6. a 버튼 누르면 씬전환, 다른 버튼은 전환되면 안되고 아이언맨하고 캡틴만 전환되어야함-> 굳이 안해봐도 잘 될거같음
7.버튼 애니메이션
8. 왼쪽 컨트롤러 thumbstick만 되는거 양쪽 다 되게 하기
time.delta 타임을 더해서 시간을 증가시키고 4초 이상이면 setactive 되도록 했는데 버튼을 이동하면 다시 unactive가 되어야한다. 이거랑 ,, 버튼이랑 둘다 어떻게 코드를 깔끔하게 구현할지 생각좀 해봐야할거같음
1. 코드 다듬기 (버튼 활성화, 이름 변경)
이랬는데
 private void ActiveButton()
    {
        if (this.num ==0)
        {
            this.characterButtons[0].onPointerEnter();
            this.characterButtons[1].onPointerExit();
            this.characterButtons[2].onPointerExit();
            this.characterButtons[3].onPointerExit();
            this.characterButtons[4].onPointerExit();
            //이름 변경
        }
        else if (this.num == 1)
        {
            this.characterButtons[1].onPointerEnter();
            this.characterButtons[0].onPointerExit();
            this.characterButtons[2].onPointerExit();
            this.characterButtons[3].onPointerExit();
            this.characterButtons[4].onPointerExit();

        }
        else if (this.num == 2)
        {
            this.characterButtons[2].onPointerEnter();
            this.characterButtons[1].onPointerExit();
            this.characterButtons[0].onPointerExit();
            this.characterButtons[3].onPointerExit();
            this.characterButtons[4].onPointerExit();
        }
        else if (this.num == 3)
        {
            this.characterButtons[3].onPointerEnter();
            this.characterButtons[1].onPointerExit();
            this.characterButtons[2].onPointerExit();
            this.characterButtons[0].onPointerExit();
            this.characterButtons[4].onPointerExit();
        }
        else if (this.num == 4)
        {
            this.characterButtons[4].onPointerEnter();
            this.characterButtons[1].onPointerExit();
            this.characterButtons[2].onPointerExit();
            this.characterButtons[3].onPointerExit();
            this.characterButtons[0].onPointerExit();
        }
이렇게 더러웠던 코드를
요래됐슴당
private void ActiveButton()
    {

        for (int i = 0; i < 5; i++)
        {
            if (i == num) this.characterButtons[i].onPointerEnter();
            else this.characterButtons[i].onPointerExit();
        }

    }
단 5 줄로 줄임 .. 요렇게 하면 잘 돌아갑니다..
딱히 뭘 찾아본건 아니고 생각을 좀 차분하게 오래 해보니 이렇게하면 되겠다 싶었다.
※참고 num =0 (아이언맨 버튼)
num=1 (캡틴 아메리카 버튼)
num=2 (토르)
num=3 (헐크)
num=4 (블랙 위도우)
예를 들어 num이 만약 1일때, i가 0~5까지 증가하면서 i가 1일때는 characterButton의 인덱스값이 1인 버튼을 active하고
1이 아닌경우(나머지 다른 버튼들)는 unactive 한다.
private void NameChange()
    {
        switch (num)
        {
            case 0:
                this.txtName.text = "아이언맨";
                break;
            case 1:
                this.txtName.text = "캡틴 아메리카";
                break;
            case 2:
                this.txtName.text = "토르";
                break;
            case 3:
                this.txtName.text = "헐크";
                break;
            case 4:
                this.txtName.text = "블랙 위도우";
                break;
        }
    }
이름 바뀌는거는 switch문으로 바꿨습니다.
2. 캡아랑 아이언맨만 색상 변경되고, 나머지는 크기만 커지기
우리는 인게임을 캡틴 아메리카와 아이언맨만 일단 만들것이기 때문에 나머지는 자물쇠로 채워놓은 연출을 하기로 하였다.
using System.Collections;
using System.Collections.Generic;
using UnityEngine;
using UnityEngine.UI;

public class CharacterButton : MonoBehaviour
{
    [SerializeField]
    private Image btnImage;
    [SerializeField]
    private GameObject bg;
    private Image image;
    private Color btnColor;
    private RectTransform rectTransform;
    // Start is called before the first frame update
    void Start()
    {
        this.image = this.btnImage.GetComponent<Image>();
        this.rectTransform = this.btnImage.GetComponent<RectTransform>();
        this.btnColor = image.color;
    }

    //캡틴, 아이언맨 활성화 Enter
    public void onPointerEnterActive()
    {

        //알파 증가
        btnColor.a = 1f;
        image.color = btnColor;
        //크기증가
        rectTransform.sizeDelta = new Vector2(110, 110);
        this.bg.SetActive(true);
    }

    //캡틴, 아이언맨 비활성화 Exit
    public void onPointerExitActive()
    {
        btnColor.a = 0.5f;
        image.color = btnColor;
        //크기 감소
        rectTransform.sizeDelta = new Vector2(100, 100);
        this.bg.SetActive(false);
    }

    //나머지 버튼 Enter
    public void onPointerEnterUnActive()
    {
        //크기증가
        rectTransform.sizeDelta = new Vector2(110, 110);
    }

    //나머지 버튼 Exit
    public void onPointerExitUnActive()
    {
        //크기 감소
        rectTransform.sizeDelta = new Vector2(100, 100);
    }
}
<SelectCharacterMain> 스크립트
 private void ActiveButton()
    {
        //캡틴, 아이언맨
        for (int i = 0; i < 2; i++)
        {
            if (i == num) this.characterButtons[i].onPointerEnterActive();
            else this.characterButtons[i].onPointerExitActive();
        }

        //나머지 버튼
        for(int i = 2; i < this.characterButtons.Length; i++)
        {
            if (i == num) this.characterButtons[i].onPointerEnterUnActive();
            else this.characterButtons[i].onPointerExitUnActive();
        }

    }
캡틴, 아이언맨/ 나머지 버튼들을 따로
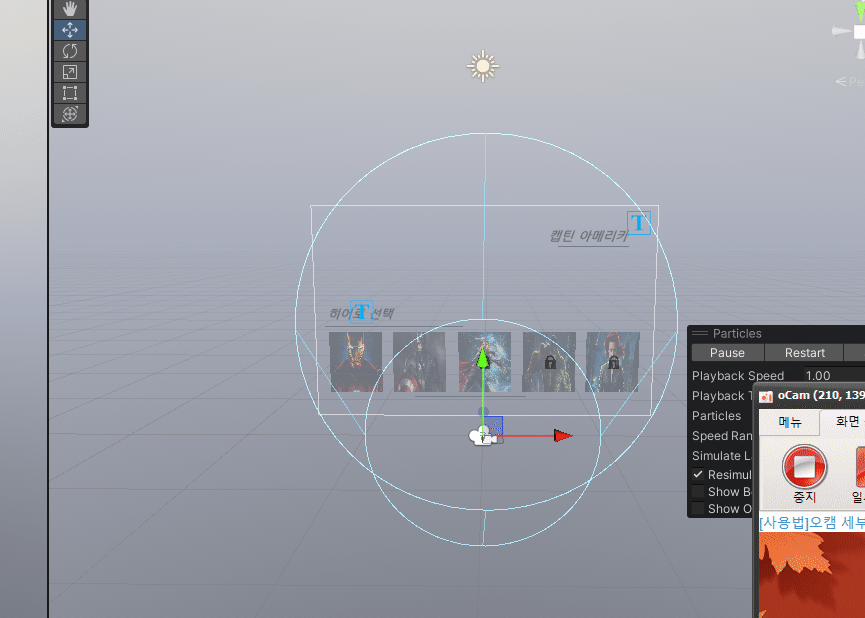
결과물

3. 특정 버튼에 3초이상 머물면 해당 3d 모델 나오고 버튼 넘어가면 즉시 사라지기
update함수에서 시간을 증가시킨다. this.time+=Time.deltaTime;
private IEnumerator CoThumb()
    {
        Vector2 thumbstickValue = OVRInput.Get(OVRInput.Axis2D.PrimaryThumbstick, controller);
        Debug.LogFormat("<color=lime>thumbStickValue.x:{0}</color>", thumbstickValue.x);//-1 0 1
        if (isMoved == false)
        {
            if (thumbstickValue.x  >0)//right
            {
                //오른쪽으로 스크롤링
                this.num++;
                this.time = 0;
                if (num >= 4) num = 4;
                isMoved = true;
                yield return new WaitForSeconds(0.2f);
                isMoved = false;
            }
            else if (thumbstickValue.x< 0)//left
            {
                //왼쪽으로 스크롤링
                this.num--;
                this.time = 0;
                if (num <= 0) num = 0;
                isMoved = true;
                yield return new WaitForSeconds(0.2f);
                isMoved = false;
            }
        }
    }
버튼이 이동되면 시간을 0으로 초기화 시킨다.
 private void ActiveWholeBody()
    {
        //아이언맨이고 시간이 3초 이상이면
        if (num == 0&&this.time>3)
        {
            //아이언맨 모델 활성화
            this.wholeBodyModelGo[0].SetActive(true);
            //캡아는 비활성화
            this.wholeBodyModelGo[1].SetActive(false);
        }
        //캡틴아메리카이고 시간이 3초 이상이면
        else if (num == 1 && this.time > 3)
        {
            //아이언맨 비활성화
            this.wholeBodyModelGo[0].SetActive(false);
            //캡틴 활성화
            this.wholeBodyModelGo[1].SetActive(true);
        }
        //아이언맨도 캡아도 아닐경우(나머지 버튼)
        else
        {
            //둘 다 비활성화
            this.wholeBodyModelGo[0].SetActive(false);
            this.wholeBodyModelGo[1].SetActive(false);
        }
    }
4. 등장 이펙트 추가

굳이 코드로 제어하지 않고 아이언맨과 , 캡틴아메리카가 활성화 될때 같이 실행되도록 자식으로 넣었다.
asset store에서 다운받은 이펙트의 색상과, duration을 내가 원하는대로 동작하도록 변경하였다.
변경하기전
너무 빨리 사라지고 색상도 원하는 색이 아닌 모습
처음만 실행하고 다른버튼으로 갔다가 돌아오면 실행을 안하길래 찾아보니
stop action이 destroy로 되어있어서 None으로 변경하니 계속 실행한다.

색상을 변경하는데 아이언맨이랑 캡틴아메리카의 이펙트가 색상이 같이 변경됨-> 같은 material을 받고 있기때문
=>material을 하나 더 복제해서 따로따로 넣어줬다
<변경 후 및 결과물>

5. 크기 증가 애니메이션
커질때만 애니메이션으로 서서히 커지고 , 작아질 땐 바로작아짐
scale 증가하는 애니메이션을 만들고 코드에 크기증가하는 코드는 지우고 애니메이션 실행 코드를 대신 작성하였다.
using System.Collections;
using System.Collections.Generic;
using UnityEngine;
using UnityEngine.UI;

public class CharacterButton : MonoBehaviour
{
    [SerializeField]
    private Image btnImage;
    [SerializeField]
    private GameObject bg;
    private Image image;
    private Color btnColor;
    private RectTransform rectTransform;
    private Animator anim;
    // Start is called before the first frame update
    void Start()
    {
        this.image = this.btnImage.GetComponent<Image>();
        this.rectTransform = this.btnImage.GetComponent<RectTransform>();
        this.btnColor = image.color;
        this.anim = this.GetComponent<Animator>();
    }

    public void onPointerEnterActive()
    {
        //알파 증가
        btnColor.a = 1f;
        image.color = btnColor;
        //크기증가
        this.anim.SetInteger("State", 1);
        this.bg.SetActive(true);
    }

    public void onPointerExitActive()
    {
        btnColor.a = 0.5f;
        image.color = btnColor;
        //크기 감소
        rectTransform.sizeDelta = new Vector2(100, 100);
        this.anim.SetInteger("State", 0);
        this.bg.SetActive(false);
    }
    public void onPointerEnterUnActive()
    {
        this.anim.SetInteger("State", 1);
    }
    public void onPointerExitUnActive()
    {
        //크기 감소
        rectTransform.sizeDelta = new Vector2(100, 100);
        this.anim.SetInteger("State", 0);
    }
}
결과

훨씬 실제 게임에서와 유사해졌다.
6. 오른쪽 왼쪽 컨트롤러 둘 다 되도록하기

컨트롤러를 LTouch RTouch 둘다 선택해도 왼쪽만 됨


컨트롤러 변수에 의해 지정된다는데 .. 왜 안될까나
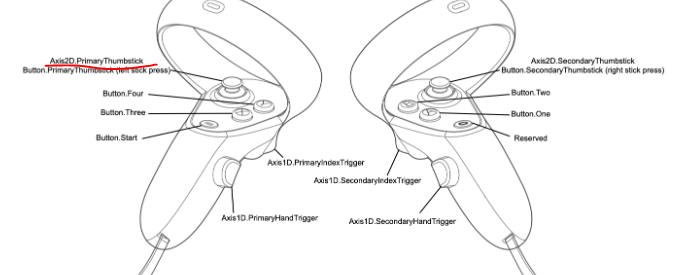
primaryTumbStick이 원래는 왼쪽이라 그런가..암튼
결국 그냥 없애버리고 코드로 LTouch, RTouch를 받음
Vector2 thumbstickValueL = OVRInput.Get(OVRInput.Axis2D.PrimaryThumbstick, OVRInput.Controller.LTouch);
        Vector2 thumbstickValueR = OVRInput.Get(OVRInput.Axis2D.PrimaryThumbstick, OVRInput.Controller.RTouch);

        if (isMoved == false)
        {
            if (thumbstickValueL.x  >0 ||thumbstickValueR.x>0)//right
            {
                //오른쪽으로 스크롤링
                this.num++;
                this.time = 0;
                if (num >= 4) num = 4;
                isMoved = true;
                yield return new WaitForSeconds(0.2f);
                isMoved = false;
            }
            else if (thumbstickValueL.x< 0 || thumbstickValueR.x < 0)//left
            {
                //왼쪽으로 스크롤링
                this.num--;
                this.time = 0;
                if (num <= 0) num = 0;
                isMoved = true;
                yield return new WaitForSeconds(0.2f);
                isMoved = false;
            }
        }
==> 이제 양손 다 잘된다!!
버튼을 더 추가해서 스크롤링 되도록 하는것과 , json으로 불러오는것은 다음 게시물에서 이어서 하도록 하자
'마블 VR 프로젝트 제작' 카테고리의 다른 글
| [마블 VR] 3ds Max를 이용해 방패 손잡이 늘리기 (2) | 2023.11.06 |
|---|---|
| [마블 VR] Curved UI(캐릭터 선택 제작) - 3 (0) | 2023.11.06 |
| [마블 VR] Curved UI(캐릭터 선택 제작) - 1 (2) | 2023.11.03 |
| [마블 VR] 구현 목록 정리 및 분석 (0) | 2023.10.30 |
| [마블 VR] 프로젝트 구현연습 (0) | 2023.10.26 |


