<남은구현>
1. 버튼 추가하고 scroll 하기
2. json 하기
3. 코드 다듬기
4. 3d 모델 등장할때 반투명했다가 서서히 선명해지기
5. 나머지 ui 구현들, 별표시, 누르기 돌아가기 어쩌구
6. 팀 svn에 옮기기
1. 버튼 추가하고 scroll 하기
이걸 하기 위해서 대략 어떻게 구현해야할지 공부해보자
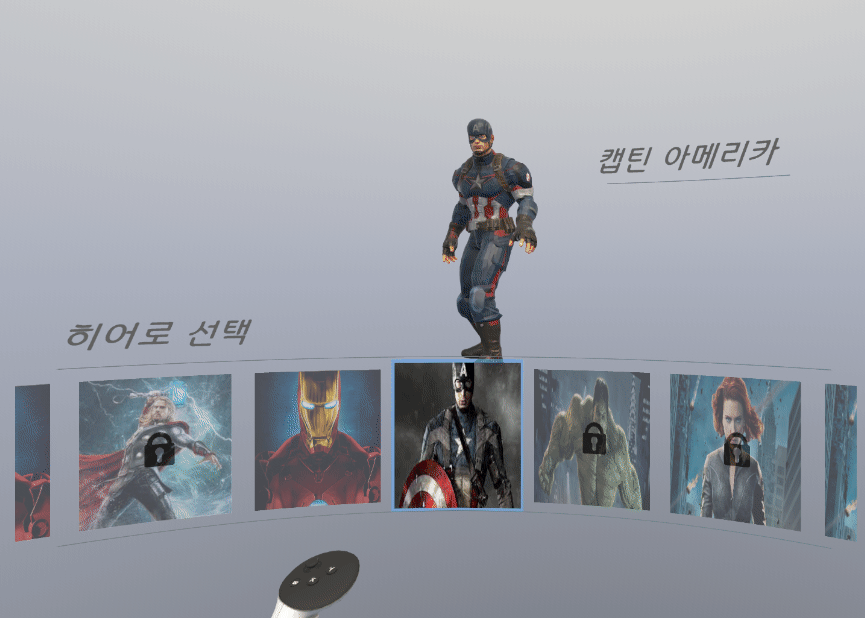
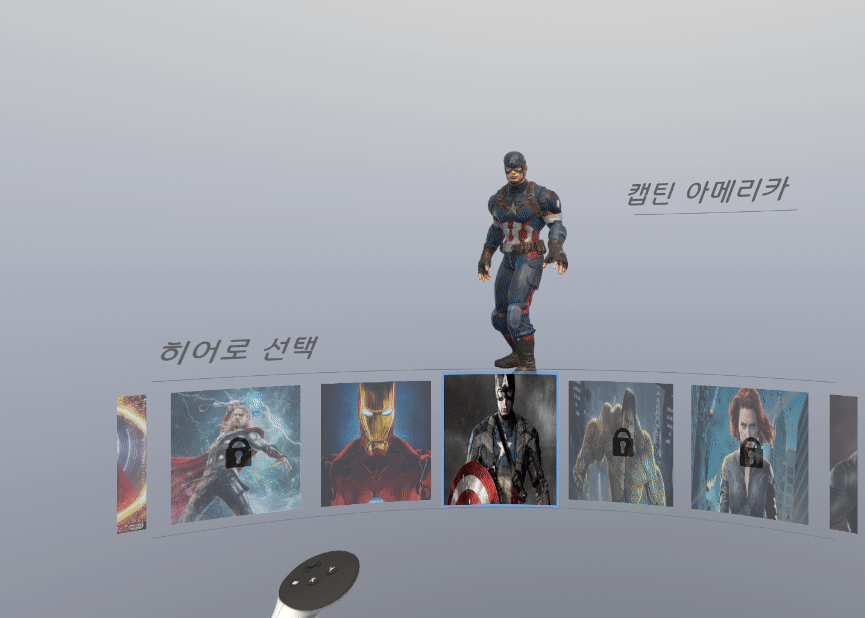
자동으로 스크롤되어야함 , Enter된 버튼이 무조건 가운데에 위치하도록 오른쪽 또는 왼쪽으로 이동해야한다.
+ 계속 순환하면서 돌아감

private void MoveDown()
    {
        //아래로 스크롤링
        //Debug.Log("down");
        nomarlizedPositionY -= 0.01f;
        if (nomarlizedPositionY <= 0) nomarlizedPositionY = 0;
        this.scrollRect.normalizedPosition = new Vector2(0, nomarlizedPositionY);
이 코드를 참고하면 될거같은데 문제는 어떻게 딱 버튼 위치에 맞게 이동할지, 특히 순환은 어떻게 할지
using System.Collections;
using System.Collections.Generic;
using UnityEngine;
using UnityEngine.UI;
using TMPro;
using UnityEditor;
using Unity.VisualScripting;


public class SelectCharaterMain : MonoBehaviour
{
    [SerializeField] private CharacterButton[] characterButtons;
    [SerializeField] private ScrollRect scrollRect;
    [SerializeField] private TMP_Text txtName;
    [SerializeField] private GameObject[] wholeBodyModelGo;
    private float normalizedPositionX = 0;
    private bool isMoved;
    private int num=2;
    private float time = 0f;
    // Start is called before the first frame update
    void Start()
    {
        this.scrollRect.normalizedPosition = new Vector2(0, 0);
    }

    // Update is called once per frame
    void Update()
    {
        this.ActiveButton();
        this.NameChange();
        this.ActiveWholeBody();
        this.StartCoroutine(CoThumb());
        this.time += Time.deltaTime;
    }
    private IEnumerator CoThumb()
    {
        Vector2 thumbstickValueL = OVRInput.Get(OVRInput.Axis2D.PrimaryThumbstick, OVRInput.Controller.LTouch);
        Vector2 thumbstickValueR = OVRInput.Get(OVRInput.Axis2D.PrimaryThumbstick, OVRInput.Controller.RTouch);

        if (isMoved == false)
        {
            if (thumbstickValueL.x  >0 ||thumbstickValueR.x>0)//right
            {
                //오른쪽으로 스크롤링
                this.num++;
                this.time = 0;
                normalizedPositionX += 0.75f;
                Debug.Log(normalizedPositionX);
                this.scrollRect.normalizedPosition = new Vector2(normalizedPositionX, 0);
                if (num >= 4) num = 4;
                isMoved = true;
                yield return new WaitForSeconds(0.2f);
                isMoved = false;
            }
            else if (thumbstickValueL.x< 0 || thumbstickValueR.x < 0)//left
            {
                //왼쪽으로 스크롤링
                this.num--;
                this.time = 0;
                normalizedPositionX -= 0.75f;
                Debug.Log(normalizedPositionX);
                this.scrollRect.normalizedPosition = new Vector2(normalizedPositionX, 0);
                if (num <= 0) num = 0;
                isMoved = true;
                yield return new WaitForSeconds(0.2f);
                isMoved = false;
            }
        }
    }


}
normalizedPositionX += 0.75f;
this.scrollRect.normalizedPosition = new Vector2(normalizedPositionX, 0);
0.75은 실행해보면서 대충 비슷하게 맞춤
문제점. num이 4면 계속 증가하지 못하도록 해놨기 때문에 이상하게 돌아간다.
private IEnumerator CoThumb()
    {
        Vector2 thumbstickValueL = OVRInput.Get(OVRInput.Axis2D.PrimaryThumbstick, OVRInput.Controller.LTouch);
        Vector2 thumbstickValueR = OVRInput.Get(OVRInput.Axis2D.PrimaryThumbstick, OVRInput.Controller.RTouch);

        if (isMoved == false)
        {
            if (thumbstickValueL.x  >0 ||thumbstickValueR.x>0)//right
            {
                this.MoveRight();
                isMoved = true;
                yield return new WaitForSeconds(0.2f);
                isMoved = false;
            }
            else if (thumbstickValueL.x< 0 || thumbstickValueR.x < 0)//left
            {
                this.MoveLeft();
                isMoved = true;
                yield return new WaitForSeconds(0.2f);
                isMoved = false;
            }
        }
    }

    private void MoveRight()
    {
        this.num++;
        this.time = 0;
        normalizedPositionX += 0.2f;
        this.scrollRect.normalizedPosition = new Vector2(normalizedPositionX, 0);

        Debug.Log(normalizedPositionX);
        Debug.Log(this.num);

        //맨 오른쪽 버튼도착
        if (num >= 9) num = 9;

        //스크롤뷰가 움직이지 않게 하기
        if (num>=7)
        {
            normalizedPositionX = 1;
            this.scrollRect.normalizedPosition = new Vector2(1, 0);
        }
    }

    private void MoveLeft()
    {
        this.num--;
        this.time = 0;
        normalizedPositionX -= 0.2f;
        this.scrollRect.normalizedPosition = new Vector2(normalizedPositionX, 0);
        Debug.Log(normalizedPositionX);
        Debug.Log(this.num);

        //맨 왼쪽 버튼 도착
        if (num <= 0) num = 0;

        //스크롤뷰가 움직이지 않게 하기
        if (num <=2 )
        {
            normalizedPositionX = 0;
            this.scrollRect.normalizedPosition = new Vector2(0, 0);
        }
    }
맨 앞뒤는 잘 막아지지만 맨 끝까지 갔다가 반대로 올 때 활성화되는 버튼이 가운데에 있는게 아니라 오른쪽으로 치우쳐짐
로그를 찍어서 뭐가 문제인지 확인
활성화되는 버튼이 가운데로 올때까지 normalizedpositionX가 1인채로 유지되어야하는데 바로 0.2가 감소해서 그렇다.
 private void MoveRight()
    {
        this.num++;
        this.time = 0;
        if (num > 2 && num < 7)
        {
            normalizedPositionX += 0.2f;
            this.scrollRect.normalizedPosition = new Vector2(normalizedPositionX, 0);
        }

        if (num >= 9) num = 9;
        if (num>=7)
        {
            normalizedPositionX = 1;
            this.scrollRect.normalizedPosition = new Vector2(1, 0);
        }
    }

    private void MoveLeft()
    {
        this.num--;
        this.time = 0;
        if (num > 2 && num < 7)
        {
            normalizedPositionX -= 0.2f;
            this.scrollRect.normalizedPosition = new Vector2(normalizedPositionX, 0);
        }

        if (num <= 0) num = 0;
        if (num <=2 )
        {
            normalizedPositionX = 0;
            this.scrollRect.normalizedPosition = new Vector2(0, 0);
        }
    }
num이 2보다 크고 9보다 작을때만 스크롤되도록 조건을 추가하였다.
+가운데부터 시작해야하므로
 private float normalizedPositionX = 0.4f;
 private int num=4;

    void Start()
    {
        this.scrollRect.normalizedPosition = new Vector2(0.4f, 0);

    }
초기화를 이렇게 해줌
전체코드
using System.Collections;
using System.Collections.Generic;
using UnityEngine;
using UnityEngine.UI;
using TMPro;
using UnityEditor;
using Unity.VisualScripting;
using Oculus.Interaction.Input;


public class SelectCharaterMain : MonoBehaviour
{
    [SerializeField] private CharacterButton[] characterButtons;
    [SerializeField] private ScrollRect scrollRect;
    [SerializeField] private TMP_Text txtName;
    [SerializeField] private GameObject[] wholeBodyModelGo;
    private float normalizedPositionX = 0.4f;
    private bool isMoved;
    private int num=4;
    private float time = 0f;
    // Start is called before the first frame update
    void Start()
    {
        this.scrollRect.normalizedPosition = new Vector2(0.4f, 0);

    }

    // Update is called once per frame
    void Update()
    {
        this.ActiveButton();
        this.NameChange();
        this.ActiveWholeBody();
        this.StartCoroutine(CoThumb());
        this.time += Time.deltaTime;
    }
    private IEnumerator CoThumb()
    {
        Vector2 thumbstickValueL = OVRInput.Get(OVRInput.Axis2D.PrimaryThumbstick, OVRInput.Controller.LTouch);
        Vector2 thumbstickValueR = OVRInput.Get(OVRInput.Axis2D.PrimaryThumbstick, OVRInput.Controller.RTouch);

        if (isMoved == false)
        {
            if (thumbstickValueL.x  >0 ||thumbstickValueR.x>0)//right
            {
                this.MoveRight();
                isMoved = true;
                yield return new WaitForSeconds(0.2f);
                isMoved = false;
            }
            else if (thumbstickValueL.x< 0 || thumbstickValueR.x < 0)//left
            {
                this.MoveLeft();
                isMoved = true;
                yield return new WaitForSeconds(0.2f);
                isMoved = false;
            }
        }
    }

    private void MoveRight()
    {
        this.num++;
        this.time = 0;
        if (num > 2 && num < 7)
        {
            normalizedPositionX += 0.2f;
            this.scrollRect.normalizedPosition = new Vector2(normalizedPositionX, 0);
        }

        if (num >= 9) num = 9;
        if (num>=7)
        {
            normalizedPositionX = 1;
            this.scrollRect.normalizedPosition = new Vector2(1, 0);
        }
    }

    private void MoveLeft()
    {
        this.num--;
        this.time = 0;
        if (num > 2 && num < 7)
        {
            normalizedPositionX -= 0.2f;
            this.scrollRect.normalizedPosition = new Vector2(normalizedPositionX, 0);
        }

        if (num <= 0) num = 0;
        if (num <=2 )
        {
            normalizedPositionX = 0;
            this.scrollRect.normalizedPosition = new Vector2(0, 0);
        }
    }

    //버튼 활성화
    private void ActiveButton()
    {
        //캡틴, 아이언맨
        for (int i = 3; i < 5; i++)
        {
            if (i == num) this.characterButtons[i].onPointerEnterActive();
            else this.characterButtons[i].onPointerExit();
        }

        //나머지 버튼
        for (int i = 0; i < this.characterButtons.Length; i++)
        {
            if (i == num && i != 3 && i != 4) this.characterButtons[i].onPointerEnterUnActive();
            else if(i != 3 && i != 4)
            {
                this.characterButtons[i].onPointerExit();
            }

        }
    }

    private void ActiveWholeBody()
    {
        if (num == 3&&this.time >2.5f)
        {
            this.wholeBodyModelGo[0].SetActive(true);
            this.wholeBodyModelGo[1].SetActive(false);
        }
        else if (num == 4 && this.time > 2.5f)
        {
            this.wholeBodyModelGo[0].SetActive(false);
            this.wholeBodyModelGo[1].SetActive(true);
        }
        else
        {
            this.wholeBodyModelGo[0].SetActive(false);
            this.wholeBodyModelGo[1].SetActive(false);
        }
    }

    private void NameChange()
    {
        switch (num)
        {
            case 0:
                this.txtName.text = "스파이더맨";
                break;
            case 1:
                this.txtName.text = "닥터스트레인지";
                break;
            case 2:
                this.txtName.text = "토르";
                break;
            case 3:
                this.txtName.text = "아이언맨";
                break;
            case 4:
                this.txtName.text = "캡틴 아메리카";
                break;

            case 5:
                this.txtName.text = "헐크";
                break;
            case 6:
                this.txtName.text = "블랙 위도우";
                break;
            case 7:
                this.txtName.text = "블랙팬서";
                break;
            case 8:
                this.txtName.text = "캡틴마블";
                break;
            case 9:
                this.txtName.text = "완다";
                break;
        }
    }

}
1. 평행사변형 모양 만들기
상위 오브젝트를 z축으로 회전하고
하위 자식 오브젝트를 z축으로 반대로 회전한다.

수평이 완벽하게 맞진 않지만 일단은 됨
'마블 VR 프로젝트 제작' 카테고리의 다른 글
| [마블 VR] 반경 안에 있는 적 공격하기 R&D (1) | 2023.11.15 |
|---|---|
| [마블 VR] 3ds Max를 이용해 방패 손잡이 늘리기 (2) | 2023.11.06 |
| [마블 VR] Curved UI(캐릭터 선택 제작) - 2 (1) | 2023.11.06 |
| [마블 VR] Curved UI(캐릭터 선택 제작) - 1 (2) | 2023.11.03 |
| [마블 VR] 구현 목록 정리 및 분석 (0) | 2023.10.30 |


